Cobalt-containing stainless steel twist drill is one of the twist drills, named after the cobalt contained in its material.Cobalt-containing stainless steel twist drills are mostly used to process stainless steel. Compared with ordinary high-speed steel twist drills, they have higher hardness and higher accuracy.
Cobalt-containing twist drills contain the chemical element cobalt Co. The purpose of adding cobalt to the raw material of the drill bit is to improve the high temperature resistance and grinding resistance of the drill bit, so that the drilling can achieve its purpose.Generally divided into two kinds of cobalt-containing and high-cobalt, there are two kinds of materials: M35 and M42. Cobalt drill bits are harder than ordinary twist drills, but they are also fragile.Tungsten steel is more brittle, but has high red hardness: although cobalt-containing steel is wear-resistant and has good toughness, its red hardness is poor.The two have their own advantages. How to choose a drill bit depends on the choice of cutting speed and cutting depth.
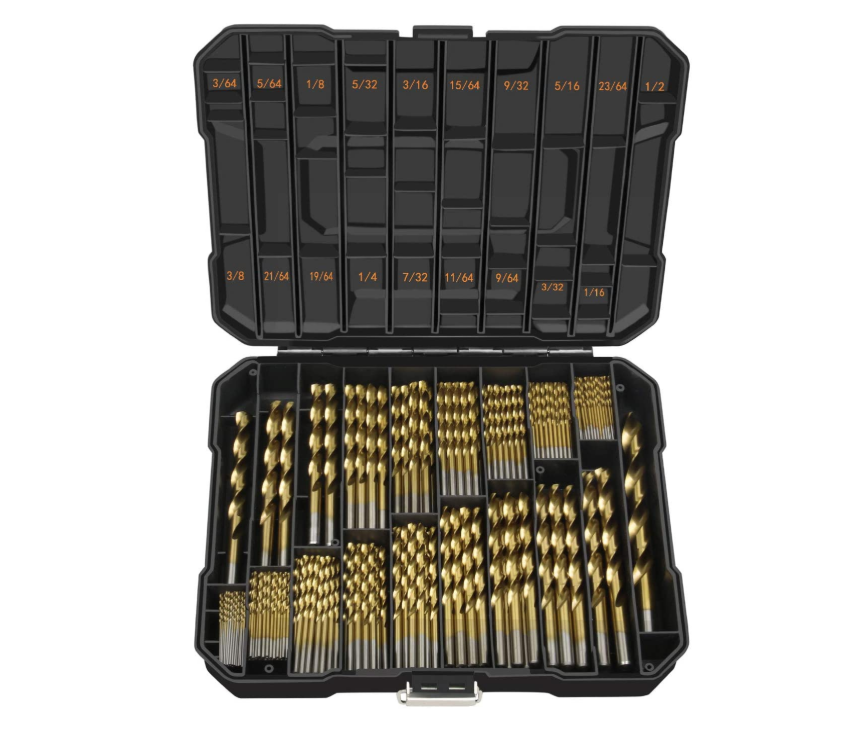
In practice, it is generally used to process stainless steel, copper, and aluminum products.These products have high strength, so they have poor plasticity.During the drilling process of these materials, the discharged water is attached to the drill bit. In order to solve this problem, future generations have invented cobalt-containing drills, group drills and so on.It's like two tightly held hands. If you have to pull it away hard, you have to buckle and grind it constantly at the separation place.In this way, the high temperature is generated.When an ordinary drill bit encounters high temperature, it expands rapidly, and the constant torque applied by the drill shank causes the drill bit itself to break, or the tip of the drill can't be used.In a simple sentence, a cobalt-containing drill is a cobalt-containing twist drill that adds the chemical element cobalt and is used to cut and grind high-temperature metals that are prone to high-temperature metals.
Sharpening method
“Less grinding” is first and foremost “no grinding”. If you get the drill bit and grind it in a hurry, it must be blindly grinding.Only by putting the position well before sharpening can the foundation be laid for the next step of “sharpening”. This step is very important. Four formulas are used here to guide the sharpening process, and the effect is better.
Formula one: “The edge is leveled and the wheel is leaning against it.”This is the first step in the relative position of the drill bit and the grinding wheel. Often, students lean on the grinding wheel and start sharpening before they have settled the edge.This must be hard to grind.The “edge" here is the main cutting edge, and “leveling" means that the main cutting edge of the sharpened part is in a horizontal position.“Wheel surface" refers to the surface of the grinding wheel."Lean" means to move closer slowly.At this time, the drill bit cannot touch the grinding wheel.
Formula two: “The drill shaft diagonally releases the front angle.”This refers to the positional relationship between the axis line of the drill bit and the surface of the grinding wheel.The "front angle" is half of the top angle of 118°±2o, which is about 60°. This position is very important, which directly affects the size of the top angle of the drill bit, the shape of the main cutting edge and the bevel angle of the horizontal edge.Students should be prompted to remember the angle of 60° in a commonly used 30°, 60°, and 90° triangle board, which is easy for students to master.Formula One and formula two both refer to the relative position of the drill bit before sharpening. The two should be integrated and balanced. Don't ignore the bevel angle in order to smooth the edge, or ignore the bevel angle in order to smooth the oblique axis.In actual operation, these errors are often very common.At this time, the drill bit is ready to contact the grinding wheel with the correct position.
Formula three: "Sharpen the back from the blade to the back.”Here refers to the slow sharpening along the entire rear blade surface starting from the edge of the drill bit.This facilitates heat dissipation and sharpening.On the basis of stabilizing and consolidating formulas one and two, the drill bit can gently contact the grinding wheel at this time for a smaller amount of sharpening. When sharpening, observe the uniformity of sparks, adjust the pressure in time, and pay attention to the cooling of the drill bit.When sharpening is restarted after cooling, it is necessary to continue to set the position of formula one and two. This is often not easy to master at the beginning, and the correctness of its position is often involuntarily changed.
Formula four: "Swing up and down, don't tilt your tail.”This action is also very important in the process of sharpening the drill bit. Often, students turn “swinging up and down” into “turning up and down” during sharpening, causing the other main blade of the drill bit to be destroyed.At the same time, the tail of the drill bit should not be tilted high above the horizontal centerline of the grinding wheel, otherwise the edge will be blunt and cannot be cut.
Post time: Oct-09-2022